Here I will tell you how to set up a LAN in Windows 2000.
Once you've set up your hardware (i.e. slotted in the network card and connected all of the computers - actually you don't have to connect to another computer at this stage, but you must have installed the network card) boot up your computer (for instructions on installing your network card, see the instructions that come with it).
Chances are the network card you have is PnP (Plug and Play) compatible. If so Windows should detect the network card and (provided you follow the on screen instructions correctly) complete the installation process (it probably gave your network card the Realtek drivers). Your computer will probably be automatically restarted to complete the installation process.
Upon loading Windows, you will be asked for your name and password. Type in a name and press OK (do not enter a password - you can do that later if you want).
Right click on the 'My Computer' icon on your desktop and select 'Properties'.
Then select the 'Network Identification' tab and select 'Properties':
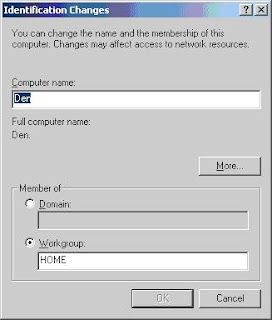
Give your computer a name (I called my PC Den because it is located in a room in my house called the Den).
Give your Workgroup a name (explanation on workgroups and domains coming soon)
Note - the computer name must be unique for each computer but the computer description can be blank/same/different for each computer. The Workgroup must be the same for each computer that wants to belong to a particular network. You can have several logical networks connected by the same physical network (i.e. cables)!
Then press OK
Right click on the 'My Network Places' icon that has now appeared on your desktop and select 'Properties'.
Then double click on 'Local Area Connection' to get to this screen:

and then select Properties to arrive here:

In here you may already have a Dial-Up Adapter (an adapter) if you have a modem and an Internet connection. If so then you'll also have the TCP/IP -> Dial-Up Adapter (a protocol) displayed. As these are just for the Internet, you can ignore them (i.e. don't edit or delete them).
Also in this box will be another adapter and another protocol relating to the adapter. This will have been set up during the previous boot-up when Windows installed and configured your new network card. The adapter may say something like Realtek RTL8029 PnP Ethernet Adapter and will have the protocol IPX/SPX-compatible Protocol -> Realtek RTL8029 PnP Ethernet Adapter.
NOTE - the protocols may not be listed as [PROTOCOL] -> FOR ADAPTER XXXX as this is not needed if there is only one adapter. In which case it will simply list the protocol being used.
To add a protocol or service, just click on the 'Install' button pictured in the screenshot above and then browse to it.
The protocols that you should install are:
Internet Protocol (TCP/IP)
NWLink IPX/SPX/NetBIOS Compatible Transfer Protocol
NWLink NetBIOS
The services that you should install are:
Client for Microsoft Networks
File and Printer Sharing for Microsoft Networks (only needed if you want other people on the LAN to browse/open/use files on your computer and access hardware attached to your computer - such as printers. more on this later...)
Now to set up the TCP/IP protocol for the network adapter (required for some games such as Close Combat IV, Half Life, etc).
Click Add Protocol Microsoft TCP/IP
You will now see something like:
Internet Protocol (TCP/IP) -> Realtek RTL8029 PnP Ethernet Adapter
Double click on this to display the following screen:
 Enter the settings as shown i.e.:
Use the following an IP address - Selected
IP Address - 10.0.0.1
Subnet Mask - 255.255.255.0
For each computer on the network the Subnet Mask must be the same, but the IP address must be different (or you will get an IP address conflict error) e.g.: 10.0.0.1, 10.0.0.2, 10.0.0.3, etc.
Click on OK to go back to the main network configuration screen.Click OK again to quit the network configuration screenWindows may ask for the Windows 2000 CD and will then ask you to restart the computer
Special note if some of the PCs on your LAN are running operating systems other than Windows 2000 and NT4.
In order for people on the other operating systems to view files on your computer you will need to enable the 'guest' account on your computer. This is disabled by default for security reasons. To enable it go to:
Start Settings Control Panel Administrative Tools Computer Management Local Users and Groups Users
Double click on Guest and then un-tick the 'Account is Disabled' checkbox.
All computers on your LAN should now be able to see the files on the PC that you have set up sharing on.
Once everyone has restarted their computers, double click on the Network icon on your desktop (also in Explorer). You should now see the names of all of the computers connected to the network. If not, try pressing the F5 key to refresh your display (although this should be done automatically). If you still can't see everyone, ask EVERYONE to reboot their computer - this is sometimes necessary. if you still can't see everyone's computer, check your settings; you probably overlooked something. For some pointers check out my troubleshooting page.
At this point you can now start playing games with your friends (soon to become mortal enemies!) :-)
Once you've set up your hardware (i.e. slotted in the network card and connected all of the computers - actually you don't have to connect to another computer at this stage, but you must have installed the network card) boot up your computer (for instructions on installing your network card, see the instructions that come with it).
Chances are the network card you have is PnP (Plug and Play) compatible. If so Windows should detect the network card and (provided you follow the on screen instructions correctly) complete the installation process (it probably gave your network card the Realtek drivers). Your computer will probably be automatically restarted to complete the installation process.
Upon loading Windows, you will be asked for your name and password. Type in a name and press OK (do not enter a password - you can do that later if you want).
Right click on the 'My Computer' icon on your desktop and select 'Properties'.
Then select the 'Network Identification' tab and select 'Properties':

Give your computer a name (I called my PC Den because it is located in a room in my house called the Den).
Give your Workgroup a name (explanation on workgroups and domains coming soon)
Note - the computer name must be unique for each computer but the computer description can be blank/same/different for each computer. The Workgroup must be the same for each computer that wants to belong to a particular network. You can have several logical networks connected by the same physical network (i.e. cables)!
Then press OK
Right click on the 'My Network Places' icon that has now appeared on your desktop and select 'Properties'.
Then double click on 'Local Area Connection' to get to this screen:
and then select Properties to arrive here:

In here you may already have a Dial-Up Adapter (an adapter) if you have a modem and an Internet connection. If so then you'll also have the TCP/IP -> Dial-Up Adapter (a protocol) displayed. As these are just for the Internet, you can ignore them (i.e. don't edit or delete them).
Also in this box will be another adapter and another protocol relating to the adapter. This will have been set up during the previous boot-up when Windows installed and configured your new network card. The adapter may say something like Realtek RTL8029 PnP Ethernet Adapter and will have the protocol IPX/SPX-compatible Protocol -> Realtek RTL8029 PnP Ethernet Adapter.
NOTE - the protocols may not be listed as [PROTOCOL] -> FOR ADAPTER XXXX as this is not needed if there is only one adapter. In which case it will simply list the protocol being used.
To add a protocol or service, just click on the 'Install' button pictured in the screenshot above and then browse to it.
The protocols that you should install are:
Internet Protocol (TCP/IP)
NWLink IPX/SPX/NetBIOS Compatible Transfer Protocol
NWLink NetBIOS
The services that you should install are:
Client for Microsoft Networks
File and Printer Sharing for Microsoft Networks (only needed if you want other people on the LAN to browse/open/use files on your computer and access hardware attached to your computer - such as printers. more on this later...)
Now to set up the TCP/IP protocol for the network adapter (required for some games such as Close Combat IV, Half Life, etc).
Click Add Protocol Microsoft TCP/IP
You will now see something like:
Internet Protocol (TCP/IP) -> Realtek RTL8029 PnP Ethernet Adapter
Double click on this to display the following screen:
 Enter the settings as shown i.e.:
Use the following an IP address - Selected
IP Address - 10.0.0.1
Subnet Mask - 255.255.255.0
For each computer on the network the Subnet Mask must be the same, but the IP address must be different (or you will get an IP address conflict error) e.g.: 10.0.0.1, 10.0.0.2, 10.0.0.3, etc.
Click on OK to go back to the main network configuration screen.Click OK again to quit the network configuration screenWindows may ask for the Windows 2000 CD and will then ask you to restart the computer
Special note if some of the PCs on your LAN are running operating systems other than Windows 2000 and NT4.
In order for people on the other operating systems to view files on your computer you will need to enable the 'guest' account on your computer. This is disabled by default for security reasons. To enable it go to:
Start Settings Control Panel Administrative Tools Computer Management Local Users and Groups Users
Double click on Guest and then un-tick the 'Account is Disabled' checkbox.
All computers on your LAN should now be able to see the files on the PC that you have set up sharing on.
Once everyone has restarted their computers, double click on the Network icon on your desktop (also in Explorer). You should now see the names of all of the computers connected to the network. If not, try pressing the F5 key to refresh your display (although this should be done automatically). If you still can't see everyone, ask EVERYONE to reboot their computer - this is sometimes necessary. if you still can't see everyone's computer, check your settings; you probably overlooked something. For some pointers check out my troubleshooting page.
At this point you can now start playing games with your friends (soon to become mortal enemies!) :-)
No comments:
Post a Comment